4) Software Requirements in ISO 26262 chapter 6
Software requirements are the result of a transformation process of the TSRs allocated to software parts and the HSIs into a set of requirements used to develop the software functions. In parallel, hardware requirements are also derived to develop the hardware elements. Software requirements describe the static and dynamic aspects of the software elements. The software elements are software components, software units and software interfaces identified during the software architectural design phase. The transformation process typically results into 3 categories of software requirements:
- Software architecture requirements describe the structure and relationships of the software components and contribute to create the software architecture. The software architecture serves as a backbone for the implementation of the software requirements. They can also express constraints about performance and robustness of a software element (sometimes called non-functional requirements).
Note: In order to manage the architecture complexity and hence meet the safety requirements, ISO 26262 recommends architecture design principles such as abstraction, modularity, encapsulation, hierarchical structure, cohesion within software components, etc. For this purpose, a suitable notation must be used. The experience has shown that the AUTOSAR architecture standard is a good candidate to fulfil the ISO requirements as it supports most of them.
- Software safety requirements focus on the safety-related functionalities to satisfy the technical safety requirements and avoid critical system situations which may lead to hazards or serious faults. (E.g.: safe execution of a nominal function, maintaining a safe state, detecting indicating and mitigating potential faults, management of time-critical operations and fault tolerances, etc.)
- Software requirements specify the non-safety software functions and are derived from the intended functions for which the HARA analysis resulted in a no ASIL rating (QM requirements).
Both safety and non-safety requirements are functional (behavioral) requirements. They describe the capabilities of the software element to act in its operating situations and express a specific reaction to a certain input stimulus. Each of these requirements needs to refer to a software component or unit and to one or multiple software interfaces defined in the software architecture.
There are many reasons for migrating to newer tool versions. IT departments keeping an eye on security might force you to move away from versions that are no longer supported (e.g. Windows 7). At the same time the ability to produce the right code / better code will motivate you to move to newer versions, e.g. based on features like:
- New AUTOSAR versions
- Improved enumeration handling
- The latest or better code optimization algorithms
Also improvements that impact the everyday life of developers and testers with new features in interactive workflows are a strong factor, e.g.:
- New TargetLink Property Manager
- Quick-Insert for library blocks in Simulink, etc.
In the end, motivated individuals produce the best results.
The reason why a lot of teams are stuck with outdated software versions is the “If it ain’t broke, don’t fix it” fear. Indeed, moving to a different version of a tool that plays an integral role in your software development – or even swapping to a different tool, e.g. replacing a VisualStudio compiler with MinGW – involves the risk of accidentally changing the behavior of your software. This kind of undetected change would lead to painful regressions that are immensely difficultto trace back and resolve, and would increase in complexity the later they are found in the process.
What we need is a way to immediately detect changes introduced by a migration in order to prevent a roll-out with undesired behavior. In the following sections I will show the migration of a model to new versions of Matlab, TargetLink and Windows. Based on this example we will explore different approaches to make sure changes get detected and automate the resulting workflow with Jenkins.
Migrating a Module
Let’s migrate our example module from ML 2015b / TL4.1 on Windows 7 to ML2018b TL4.4 on Windows 10. I will copy my old model to another folder, open it on Windows 10 with Matlab 2018b and let Matlab and TargetLink perform the needed data conversion steps automatically. We now have a migrated model. Easy enough, right? The only thing that’s left to do is to somehow check for undesired changes.

Exploring ways to detect undesired changes
Approach 1: Compare the C-Files
We can actually save a lot of time and effort if we can show that the code from the old model and the new migrated model are the same. Let’s generate code from our migrated model, then grab the C files containing the main step function (original & migrated) and throw them into Beyond Compare:
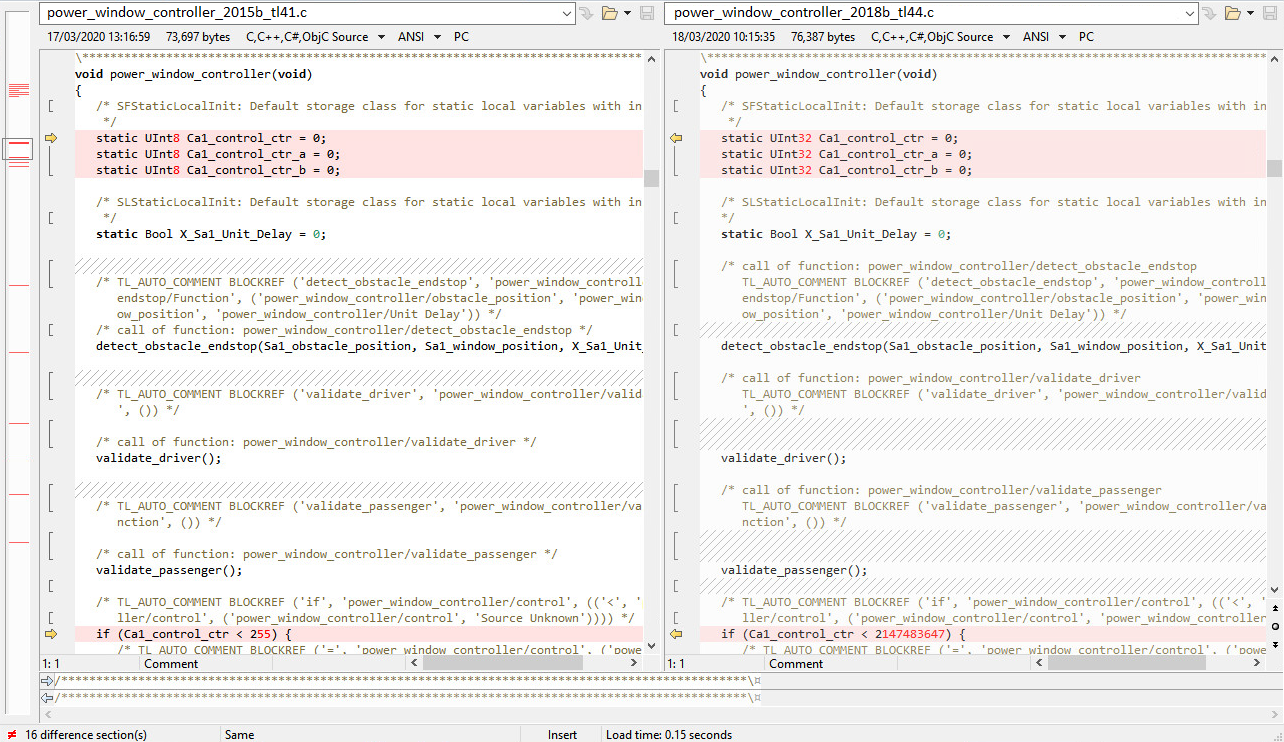
Comparing the c-files of the old and new configuration
Even after a lot of tweaks that ignore comments, whitespace changes, etc. we’re still stuck with 16 difference sections, and even different variable sizes are being used. That’s surprising since I didn’t change the model… It seems we can forget our awesome idea to check for changes by simply comparing the code. And come to think of it, we can’t and shouldn’t expect the code to be the same. We’re using a Code Generator and we expect each new version of the code generator to improve the code optimization. We also would not expect to get the exact same object code if we change a compiler version.
So let’s accept that the code looks a bit differently. But hopefully it still behaves in the same way… so what can we do to check that?
Approach 2: Re-Run Functional Tests
Naturally we want the migrated module to meet our requirements just like our original module. So why don’t we set up a test project for the migrated module and import the existing test cases that we have. Those were written based on the requirements for our module and check the appropriate behavior. Creating the test project is fairly simple, we just point to the model and let our test tool take over from there. After importing our existing test cases we run them and check the results:
Awesome! All of our tests are still passing on the migrated module. However, if we take a closer look into the test case, the concept of using our requirements-based tests to ensure the migration shows a weakness:
The test case was designed to check if a particular part of our system under test reacts correctly to a specific situation. This leaves a lot of room for deviation. Even if our module still meets the requirements, we don’t want to miss any changes in its behavior. Naturally, a requirements-based test case does not check the exact value of every signal in every step of the execution, that would be pretty inefficient. After all, that’s not what a requirements-based test is supposed to do thus we cannot only rely on passed test cases when checking the impact of the migration. I guess we need yet another approach that takes this into account.
Approach 3: Regression Test with Functional Tests
This is where the concept of a structural regression test comes in handy. It does exactly what our last approach was missing: it compares all signals in all steps of the executions. In our scenario we would compare the executions of the original module with those of the migrated module: ML2015b/TL4.1 vs. ML2018b/TL4.4. The expected behavior defined in our test cases doesn’t play a role here anymore since the structural regression test is – indeed – structural. It doesn’t check if the system under test behaves “correctly”. The goal of the structural regression test is to check if both versions of the system under test behave exactly the same. We can easily do this with the following steps:
- Simulate test cases in the old test project (based on the original module)
- Export the execution records
- Import them into the new test project (based on the migrated module)
- Run the Regression Test
The Regression Test passed showing us that the behavior of the migrated module doesn’t show the slightest deviation. Looking back at the previous approach we now compared each signal in every step.
We’ve come close to a solid solution but looking at the coverage we can see that we still have a problem:
No matter how desirable it is, most projects don’t reach 100% MC/DC with requirements-based tests. We now know that our migrated module behaves the same for the set of test cases we used but obviously there is plenty of uncovered code left for which we don’t know this. We still cannot say with confidence that the migration was successful.
Approach 4: Regression Test with 100% Coverage
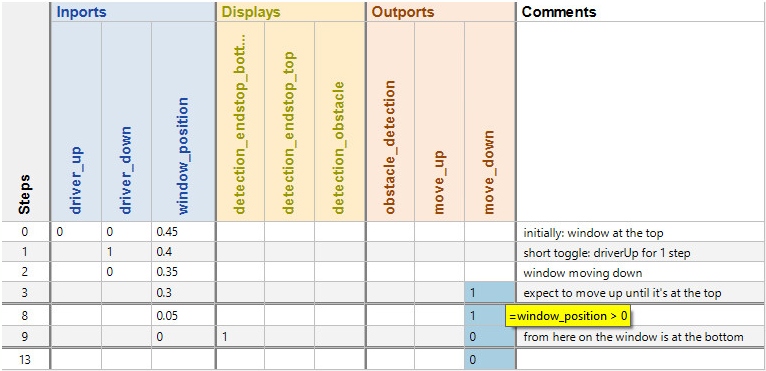
One option would be to write additional test cases. Having high coverage from requirements-based tests is desirable after all. However, in real production projects the effort of getting to 100% coverage is often not accepted. Luckily we can automatically generate stimuli vectors for this purpose that bring us to full coverage. A stimuli vector is similar to a test case but it only contains values for inputs and calibrations, no expected behavior is defined. As explained above though, the Regression Test is structural. The expected values for the regression test come from the reference simulation and in the end we want to show that the migrated module behaves the same.
The resulting workflow enables a complete comparison (all signals in every step with full coverage) and looks like this:
- creating a test project for the original module
- importing existing test cases (optional)
- generating additional stimuli vectors for 100% coverage
- performing a reference simulation
- exporting the execution records for the regression test
- creating a test project for the migrated module
- importing the execution records from the original module
- performing the regression test: original module vs. migrated module
Automating our Workflow with Jenkins
Now that we’ve come up with a suitable workflow to prevent undesired changes during the migration, let’s prepare a fully automated workflow in Jenkins. We will set up a Jenkins Pipeline which embraces the concept of Configuration as Code by specifying what Jenkins needs to know about a workflow in a so-called Jenkinsfile. This is important because with the increasing importance of automation in today’s software development the configuration of automated workflows is just as crucial as the code itself.
The files we’re using for this example are stored in a Github repository but the procedure is the same even when you’re using another source code management system. In the Jenkins web interface, we’ll create a new Pipeline job from scratch (New Item > Pipeline). The only thing we need to configure is the URL that points to the repository containing our files. When running the Pipeline job, the Jenkins Master will first grab the Jenkinsfile from the root of our repository and parse it. This way, Jenkins knows exactly what steps to perform and what kinds of Jenkins Agent machines are suitable for the task. All we need for our migration test workflow are two steps:
Step1: The Reference
In this step we perform all required tasks on the original module:
- (1) creating a test project for the original module
- (2) importing existing test cases (optional)
- (3) generating additional stimuli vectors for 100% coverage
- (4) performing a reference simulation
- (5) exporting the execution records for the regression test
Step 2: The Comparison
In this step we perform all required tasks on the migrated module:
- (6) creating a test project for the migrated module
- (7) importing the execution records from the original module
- (8) performing the regression test: original module vs. migrated module
A passed result based on this workflow let’s us say with the confidence that the migration did not introduce any changes in our module. If it does, we will know immediately and have test cases that we can use for debugging.
Summary
We started off with the need to migrate to newer tool versions or even change some of the tools involved in our software build process. At the same time, if the migration introduced undesired behavior, we want to see this right away and not notice it weeks or months later when the tool migrations has already been deemed successful. Trust me, coming from a DevOps background I know that having to roll back to some years older tool versions after a while causes a lot of mayhem.
Thus, we explored different approaches to detect undesired changes right away. These are lessons learned:
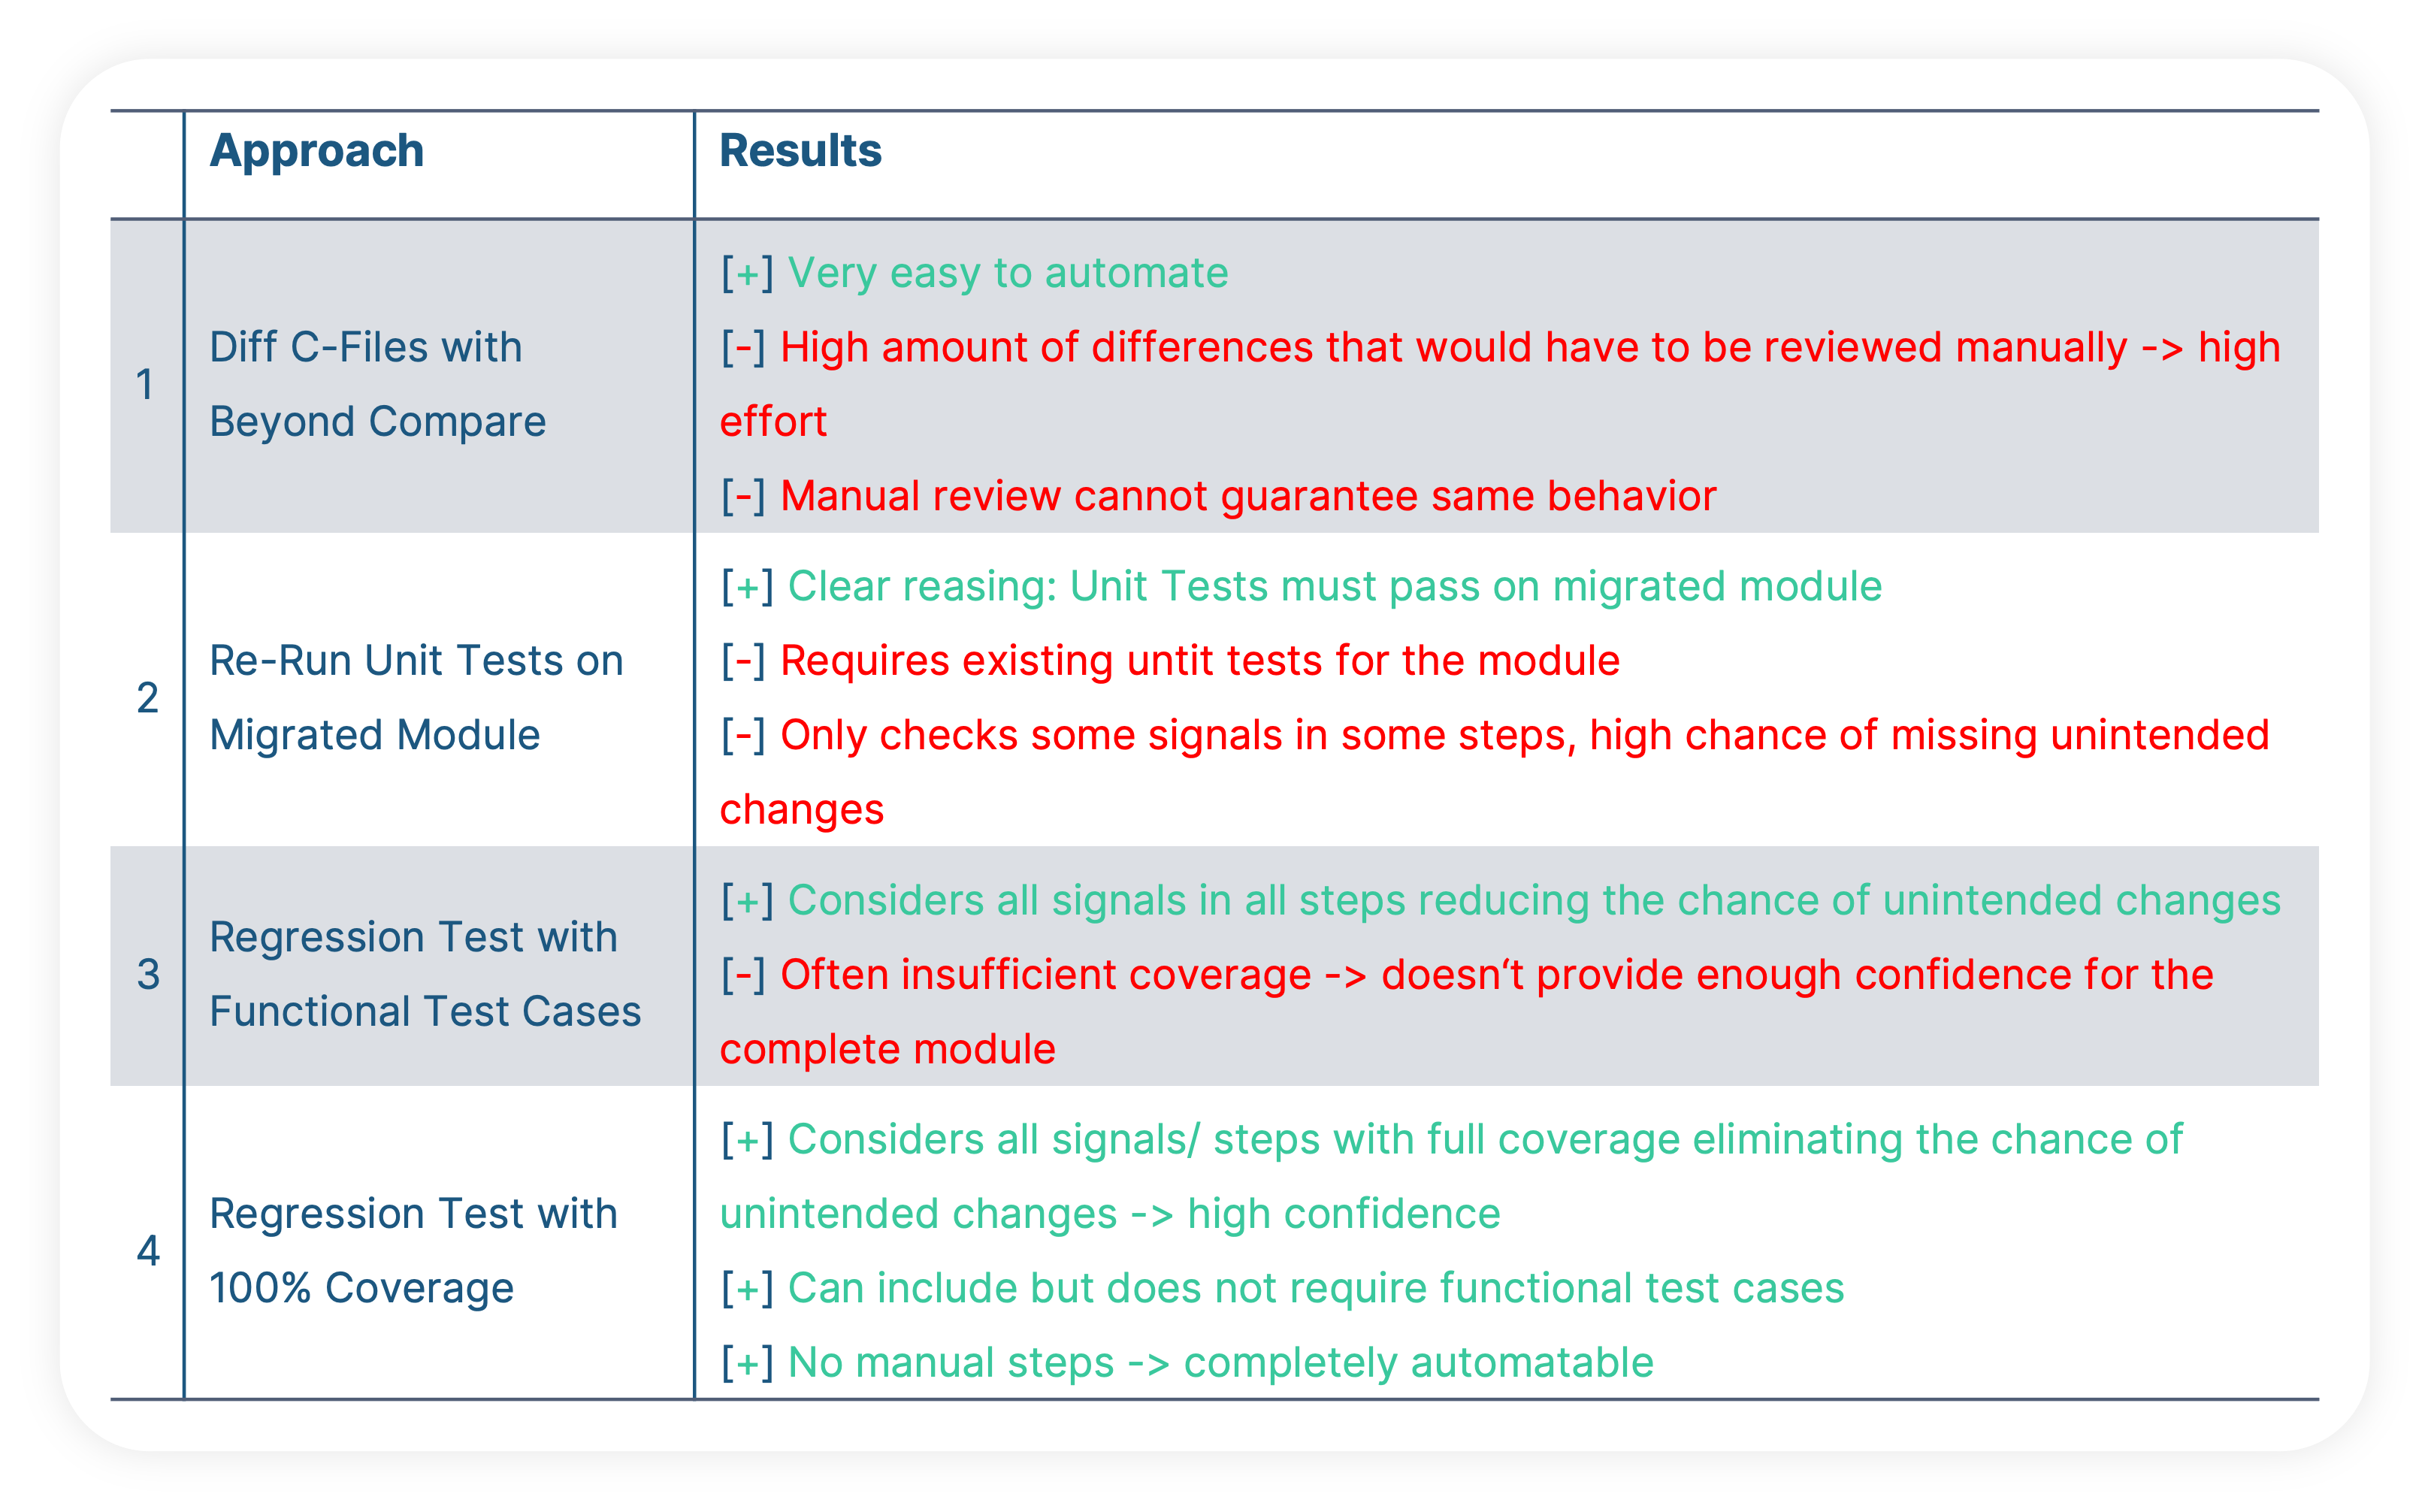
Ultimately, when we’re faced with a big number of complex tasks with high risk that we’re afraid of and that keep us awake at night, my advice is the following:
- Understand it
- Automate it
- Make good use of it
Making good use of an automated workflow increases your confidence in it allowing you to sleep like a baby.
Want to see more?
Check out our Live Webinar in which we demonstrate all 4 approaches.