Optimization
“We know that Jenkins is great and all but we’re not some cloud-based start up. It would take ages to have server infrastructure available only to realize that it doesn’t support our workflows and tools after all.”
Even though Jenkins is rapidly growing in automotive embedded software development I hear a lot of stories like the one above. This tells me that:
- The threshold to get started with Jenkins is conceived to be quite high
- People prefer not to involve the IT department if there’s another way
- A certain level of confidence can only be aquired by hands-on experience
In contrast to many other examples I avoided the use of the command line because many Windows users are not as comfortable with command line interfaces as Linux users. This article requires no prior knowledge of Jenkins but assumes that you have an internet connection and know the basics of using source code management systems (scm) like Git, Subversion, Mercurial, TFS or similar. If SCM terms like commit / checkout / clone / push / pull don’t mean anything to you I recommend to do some research on the topic. The getting started page from Git explains the concept pretty nicely.
In order to get have Jenkins running on our own laptop we will perform the following three simple steps:
- Install the required software
- Git as the scm tool
- Tortoise to have a user interface to interact with Git
- Jenkins
- Create a local git repository
- Create and run a pipeline
Installations
Git
- We will use a git repository to store our files
- Git can be downloaded from https://git-scm.com/download
- There’s nothing special to consider during the installtion process
Tortoise
- In order to create a local git repository and to commit changes we will use Tortoise
- Tortoise serves as an alternative to using the git command line interface
- It can be downloaded from https://tortoisegit.org/download
- Be sure to also finish the “First Start Wizard” which appears directly after the installation
Jenkins
- You can get the Jenkins installer for Windows from http://mirrors.jenkins-ci.org/windows-stable/latest
- Run the installer (*.msi) and follow the instructions
- Provide the credentials of your Windows user to allow Jenkins to run tasks as your user. The alternative option “Local System” has a lot of drawbacks and will is bound to cause access right issues at some point.
- Most people alreay have a Java runtime installed. If that’s not the case for you you can get Java from https://www.java.com/en/download/win10.jsp
- The installation process will open a browser window at http://localhost:8080
- This address can be used to access your own Jenkins server which is now running locally on your machine. On that page, navigate through the initial steps to complete the setup.
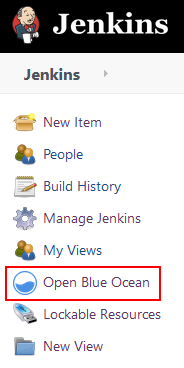
- In addition, let’s install the Blue Ocean plugin which offers a much more modern user interface:
- Go to the menu on the upper left side of the page
- Manage Jenkins > Manage Plugins
- Click on the “Avaiable” tab to view plugins available for installation
- Type “blue ocean” into the search bar and scroll to the end of the list
- Tick the checkbox of the “Blue Ocean” plugin and click the “Install without restart” button on the bottom of the page
Setting up a git repository
We will make use of git to have a local source code repository but you can replace that by any other source code management system (Subversion, TFS, etc.). A source code repository is the central container for any continuous delivery (CD) pipeline. One of the core principles of designing a solid CD pipeline is to make the steps work in isolation. It shouldn’t matter where your code is built and tested. However, what you can still rely on is the internal structure of the files in your source code repository.
We’ll create a local repo on you machine that you can freely use for experiments without impacting existing production systems:
- Create a folder that will serve as your git repository, e.g.
C:\Users\yourname\my-repository - Go into that folder and do a right click
- Select the context menu entry
Create Git repository hereand confirm the next dialog (no need to make it bare) - …and that’s it, your git repository is ready to receive commits!
Creating & Running the Pipeline
We want to add a Pipeline that checks out your repo and performs a simple check (see next step)
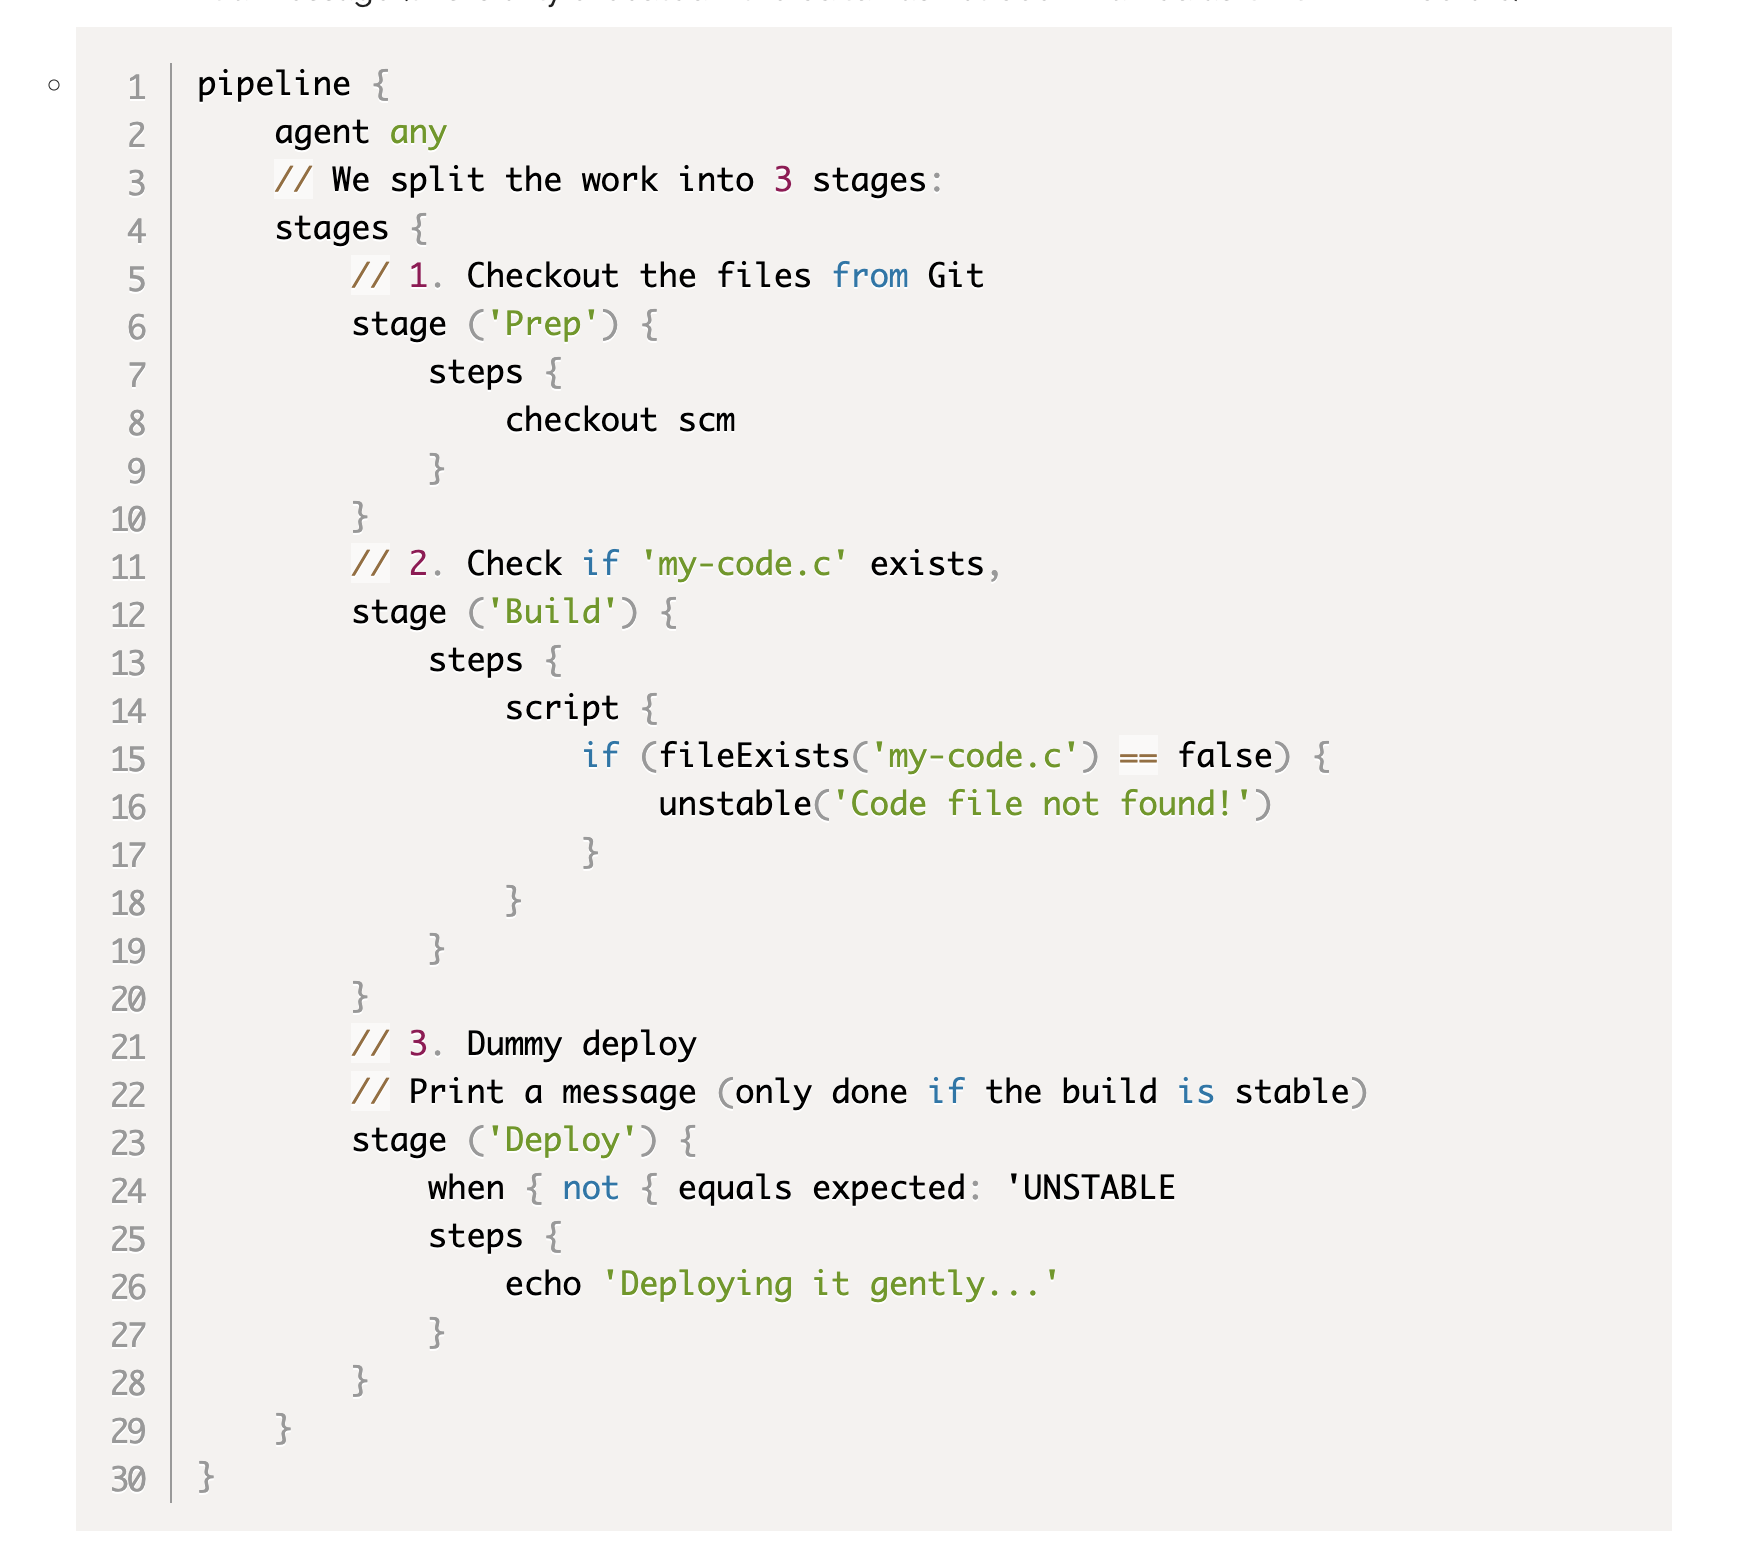
- Create a simple pipeline as depicted in the code sample below and save it to your folder as a file called “Jenkinsfile” (no file extension)
- The pipeline has the following 3 stages:
- Checkout our files from the scm repo (git)
- Check for the existance of a file called “my-code.c” and mark the build as UNSTABLE if the file does not exist
- Print a message (this is only executed if the build has not been marked as UNSTABLE before)
- Save the file and perform a right-click in your repository folder
- Go into that folder and do a right click on
Git Commit > "master" - Add a comment and commit the Jenkinsfile
Hook it up to Jenkins
Since the Jenkinsfile already contains every detail about which steps to execute it’s easy to add this to Jenkins as a Pipeline job.
- Click on “New Item”
- Give it a name and select the “Pipeline” type
- All we need to tell Jenkins is where to find the Jenkinsfile
- Select Git as the SCM
- Enter the repository path (e.g.
C:\Users\yourname\my-repository) - Click
Save
Running the Pipeline
Before we run the pipeline let’s switch over to the Blue Ocean UI (see screenshot). Although the Blue Ocean UI looks much nicer it’s easy to get lost if you’re used to the classic UI. You can always return to that by clicking onto the -> button on the upper right corner (“Go to classic”).
- select the Pipeline item that you just created and click “Start” to kick off the first run
- The result will look like this:

- The build is marked as UNSTABLE because the file “my-code.c” doesn’t exist
- The “Deploy” stage is skipped due to that
- Add Code: create new file (e.g. “my-code.c”) and run Pipeline again -> SUCCESS

- The build is no longer marked as UNSTABLE because the file “my-code.c” now exists
- The “Deploy” stage is no longer skipped
Further thoughts
You might be asking yourself why we only needed to install one piece of software for Jenkins. Isn’t Jenkins supposed to run in a client-server setting? It’s true that there’s usually one main server* which orchestrates everything and provides the web ui and a couple of agent machines that take over the actual workload. However, the Jenkins master (which is what we installed) can also take over work. Although this is not recommended for production systems it’s a great way to have a small local setup to use for experiments.
*there could be more than one – but let’s ignore that for now
Next Steps
You have now successfully installed Jenkins on your local PC or laptop and know how to create local repositories that you can commit files to. Use this to your advantage and try to create some prototypes that support workflows which are relevant for your team’s software build. I hope this article motivates you to get started with Jenkins to get some hands on experience.
Check out https://www.jenkins.io/doc/book/pipeline/getting-started to learn more about the syntax and available steps for your Pipeline (Jenkinsfile) or reach out to the community in case you need help with something more specific.
And please also watch our video tutorial showing the main steps of this process: